Answers to frequently asked questions
FAQ about our QNix® coating thickness gauges
General questions about QNix® coating thickness gauges
We generally recommend recalibration once a year – this is sufficient for many users. However, what users themselves define as their own quality features varies.
Yes. We want to ensure that the measuring device can be used quickly and therefore rely on replaceable parts. Contact us and we will send you a replacement part. We set ourselves the target that a measuring device sent to us should leave our premises after two days.
QNix® 9500 FAQ's - Handheld device
| Adjustment settings | Limit value settings |
| ISO 19840 Zero Offset | ISO 19840 |
| ISO 19840 2-Point | SSPC PA2 (80/120) (Level 1-5) |
| SSPC PA2 Zero Offset | IMO PSPC (90/10) |
| SSPC PA2 2-Point |
The scope of delivery of the QNix® 9500 with modular probe includes
– Hand-held device QNix® 9500
– PC software QN9
– Fe and NFe reference plate and two test foils
– Operating instructions
– USB cable
– Probe adapter cable for extending the probe
– Probe holder
– 2 AA batteries 1.5 V (AA) Alkaline
– Plastic case for transportation and storage
If you order a probe, the scope of delivery is extended by the following components:
– Measuring probe
– Test certificate for measuring probe
QNix® 9500 FAQ's - Measuring probe
The standard probes available for the QNix® 9500 differ in terms of the measuring range and the substrate to be measured. Fe probes are suitable for measuring on steel and iron, NFe probes for measuring on non-ferrous metals and dual probes can do both.
The following Fe and dual standard probes are available for the modular QNix® 9500:
Fe measuring ranges: 1.25 mm, 3 mm and 5 mm
NFe measuring ranges: 3 mm and 5 mm
Dual Fe/NFe measuring ranges:
| Fe | NFe |
| 1.25 mm | 1.25 mm |
| 3 mm | 3 mm |
| 5 mm | 3 mm |
| 5 mm | 5 mm |
- Remove the probes from the hand-held device or case using the probe holder
- Screw the probe with the probe holder to the adapter cable
- Connect the probe adapter cable to the hand-held device
The digital copy of the current test certificate, which is located on each probe, allows you to integrate it into a report via the QN9 software.
QNix® 9500 FAQ's - Operation
The focus frame enables quick navigation through the most important information in the measurement process.
In the lower position, you can switch between the graphical and the number-based display of statistical data.
In the middle position (measured value area), you can scroll through each measured value of the temporarily saved current measurement series or the activated area. Individual, e.g. incorrect measured values can be deleted directly.
In the upper position, you can change the individual areas of a job, depending on the device version. The respective statistical data is displayed in the lower area and the respective measured values in the middle area to match the corresponding area.
You navigate intuitively through the handset. The menu shows 4 tabs with submenu items. The video shows how easy it is to navigate the menu.
Tip: The handset remembers your position in the submenu of the respective tab when you switch between several tabs. These shortcuts allow settings to be made more quickly.
- Open the menu on the handset
- Switch to the red tab for limit values and averaging
- Select the type of limit value:
- “No limits” (limit values and averaging are deactivated)
- “Simple limit values” (maximum, minimum, averaging, automatic range)
- “Individual” (Like simple limit value + maximum and minimum per spot)
- Limit values according to standard ISO 19840, IMO PSPC or SSPC PA2 Level 1-5 (Premium+)
- Activate Minimum, for example, and set the value for the minimum permissible layer thickness
1. open the menu on the handset
2. select “New job
3. select “New empty job” to create a new job
Tip: You can use the QN9 software to create job templates and save them on the device. With job templates, you can predefine and freely name areas and define limit values for the job or each individual area within a job.
- Open the menu on the handset
- Switch to the blue tab for jobs
- Select a job
- Select “New area”
- The area is created immediately
- Select “Activate area” to save measured values in the area or go back one level to create additional areas.
- Open the menu on the handset
- Switch to the blue tab for jobs
- Select a job
- Select “New area”
- The area is created immediately
- Select “Activate area” to save measured values in the area or go back one level to create additional areas.
Areas are files in which your measured values and limit value settings are saved on the device.
Jobs correspond to folders on the device in which areas are saved
You can use jobs to organize your measuring tasks, e.g:
- Series testing in production
- One area in this job per tested component
- One job per batch
- Shipbuilding
- One job per order
- One area in this job per test area
- Multilayer systems
- One job per object
- One area per shift
- Open the menu on the handset
- Switch to the green tab for settings
- Select system
- Select “Set softkey”
- Select your preferred assignment of the Q button there
QNix® 9500 FAQ's - Functions
If you have set limit values, the integrated LED limit value display immediately shows any deviation: red LEDs light up on the probe. Green illuminated LEDs indicate a measurement within the limit values.
You therefore have full control over whether a measurement is within your limit values without having to look at the device.
QNix® 9500 FAQ's - Software
First you need to start the QN9 software on your PC, connect your handset and synchronize it with the software using the “File Sync” button. Then click on the “Creation” tab in the quick menu and the following screen will open:
- Select the appropriate job
- Select a report template
- Click on create & save
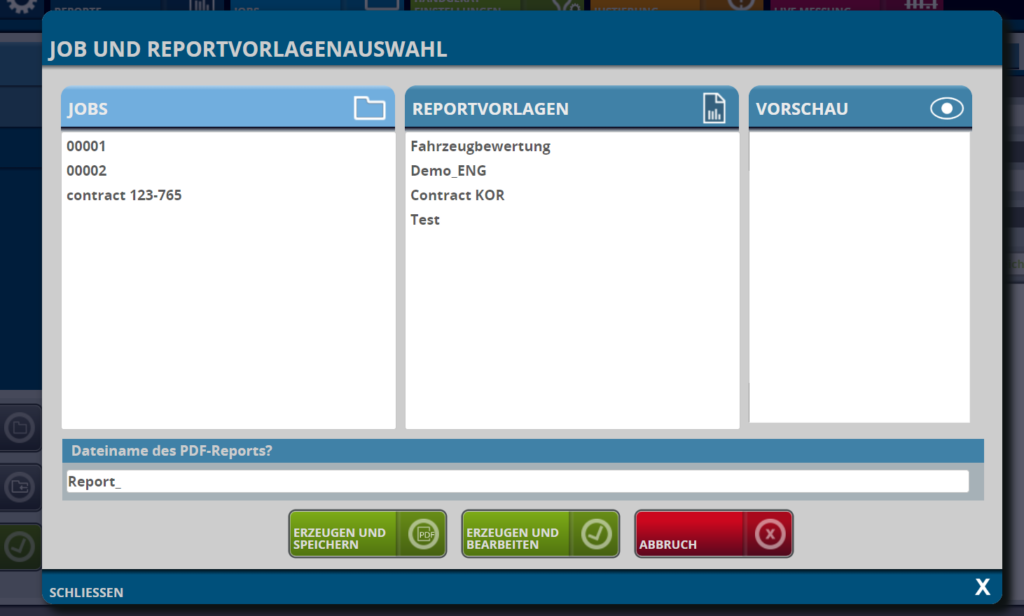
The creation of a report template works via drag-and-drop and is therefore almost self-explanatory
QNix® 4600 FAQ's - Handheld device
- Coating thickness gauge QNix® 4600
- Fe and NFe reference plate
- Calibration certificate
- Operating instructions
- 2 AA batteries 1.5 V (AA) Alkaline
- Plastic case for transportation and storage
| QNix® 4600 Fe | QNix® 4600 Dual (Fe and NFe) |
| 1.2 mm | |
| 3mm | 3 mm |
| 5 mm |
QNix® 4600 FAQ's - Operation
QNix® 4600 FAQ's - Functions
The device must be switched off before cleaning. Always use a damp, soft and lint-free cloth. For heavier soiling, if cleaning with water is not sufficient, please use mild cleaning agents.